Showing posts with label Linux. Show all posts

Saturday, July 13, 2013

Simple analyst dns spoofing in form site


hi guys, I am including lay people in the security of information systems. Initially I was never in touch with penetration testing tools. and I now realize that I should have the ability in the field of information systems security. at least I can know what vulnerabilities exist on my website.
I'll just share a little about the security of dns spoofing. not many web programmers who know the security holes on its own website. Here I will take a few examples, at least we can secure the login form when we create a website that has a degree in permissions.

in my post this time, I will only discuss the security breaches that occur when we create a login form. alan affection for penetration testing using a simple tool called ettercap.

Her usual when we make a login form, we will make a name for each field with a memorable name. for example:

I will create a login form with username and password fields. usually a common web programmer will create a field name that is similar to the label field. as an example in flogin.php

The source code is  


<form action="tologin.php" method="POST">
Username <input name="username">
Password <input name="password">
</ form>

as a small picture, a login form with the HTML tag type as it is very vulnerable to capture in the dns spoofing techniques.

we prove to scan web pages which I have provided with a login form like the format.


# ettercap -T -q -M arp -i em1 -P dns_spoof ///


the technique as above, we will scan the network for which we use locan. ate whenever a user logs on and happened to be in our network and form login form as above, we will get results like this.


easy way to prevent this, do not use the name in the input field login form with username / password or user / pass to use the name with extra characters or use a different name from text label of field.

may be useful, and sorry if my english not  good 

Sunday, June 16, 2013

failed running MOCP


hai guys, i want to share a solution in MOCP.
when you running a MOCP, you find this problem

Running the server...
Trying OSS...

FATAL_ERROR: No valid sound driver!


FATAL_ERROR: Server exited!

first, you can try check your problem in ALSA

# alsa_out

and you will find :
Cannot connect to server socket err = No such file or directory
Cannot connect to server request channel
jackdmp 1.9.9.5
Copyright 2001-2005 Paul Davis and others.
Copyright 2004-2012 Grame.
jackdmp comes with ABSOLUTELY NO WARRANTY
This is free software, and you are welcome to redistribute it
under certain conditions; see the file COPYING for details
no message buffer overruns
JACK server starting in realtime mode with priority 20
audio_reservation_init
Acquire audio card Audio0
creating alsa driver ... hw:0|hw:0|1024|2|48000|0|0|nomon|swmeter|-|32bit
lsof: WARNING: can't stat() fuse.gvfsd-fuse file system /run/user/1000/gvfs
      Output information may be incomplete.
Cannot connect to server socket err = No such file or directory
Cannot connect to server request channel


ATTENTION: The playback device "hw:0" is already in use. The following applications  are using your soundcard(s) so you should  check them and stop them as necessary before  trying to start JACK again:

pulseaudio (process ID 1663)

JackTemporaryException : now quits...
Cannot initialize driver
JackServer::Open failed with -1
Failed to open server
Cannot connect to server socket err = No such file or directory
Cannot connect to server request channel
Cannot connect to server socket err = No such file or directory
Cannot connect to server request channel
Cannot connect to server socket err = No such file or directory
Cannot connect to server request channel
Cannot connect to server socket err = No such file or directory
Cannot connect to server request channel
jack server is not running or cannot be started
jack server not running?

so you have problem in jack driver.

this is solution for it :

i find this problem in my fedora 18. I try install

1. # yum install jaaa.x86_64 japa.x86_64 ambdec.x86_64 pulseaudio-module-jack.x86_64 bio2jack.x86_64

2. # yum install jack-audio-connection-kit.x86_64 jack-audio-connection-kit-devel.x86_64 bio2jack-devel.x86_64

3. # yum install python-alsa.x86_64 alsa-tools-firmware.x86_64 alsa-oss.x86_64

after install you run this CLI

$ aoss mocp

if you reboot and will start using MOCP and find problem again about this, you just run

$ aoss mocp

have fun, and good luck.

Sunday, May 26, 2013

Theme drayanaindra oh-my-zsh


this is my theme. you can clone this theme in my Github. for use, you just copy to your directory .oh-my-zsh/theme/ and change name ZSH_THEME="drayanaindra" in .zshrc file.


and enjoy guys...

Saturday, January 26, 2013

Failure when start service httpd on Fedora 18


hai guys, i try install Feodra 18
mmm.. when i try install and start service httpd on my fedora 18. i find problem when will start service httpd.

this tutorial i can share the solution for this problem.

when typing :
sudo service httpd start 

service respone and show this message :
Job for httpd.service failed. See 'systemctl status httpd.service' and 'journalctl -xn' for details.

you can check for the problem using :
sudo systemctl status httpd.service

and will show log:
httpd.service - The Apache HTTP Server
      Loaded: loaded (/usr/lib/systemd/system/httpd.service; enabled)
      Active: failed (Result: exit-code) since Sun 2013-01-27 00:26:20 WIT; 9s ago
     Process: 7518 ExecStop=/usr/sbin/httpd $OPTIONS -k graceful-stop (code=exited, status=0/SUCCESS)
     Process: 7516 ExecStart=/usr/sbin/httpd $OPTIONS -DFOREGROUND (code=exited, status=1/FAILURE)


and then,
sudo journalctl -xn

and will show log:
-- Unit httpd.service has failed.
--
-- The result is failed.
Jan 27 00:26:20 tkl systemd[1]: Unit httpd.service entered failed state
Jan 27 00:26:30 tkl systemd[1]: SELinux Got Sender :1.132
Jan 27 00:26:50 tkl yum[6634]: Installed: libmng-1.0.10-8.fc18.x86_64
Jan 27 00:26:51 tkl yum[6634]: Installed: kde-filesystem-4-42.fc18.x86_64
Jan 27 00:26:52 tkl yum[6634]: Installed: qt-settings-4.9-16.fc18.1.noarch
Jan 27 00:26:53 tkl sudo[7598]: drayanaindra : TTY=pts/1 ; PWD=/home/drayanaindra ; USER=root ; COMMAND=/bin/journalctl -xn


 now, you can cek your ServerName in /etc/httpd/conf/httpd.conf and config same with this :
ServerName localhost

cek your error log when will start your service using :
sudo tail -f /var/log/httpd/error_log 

and in my fedora show :
[Sun Jan 27 00:29:38.704621 2013] [core:notice] [pid 7770] SELinux policy enabled; httpd running as context system_u:system_r:httpd_t:s0
[Sun Jan 27 00:29:38.706668 2013] [suexec:notice] [pid 7770] AH01232: suEXEC mechanism enabled (wrapper: /usr/sbin/suexec)
[Sun Jan 27 00:29:39.201736 2013] [unique_id:alert] [pid 7770] (EAI 2)Name or service not known: AH01564: unable to find IPv4 address of "tkl"
AH00016: Configuration Failed


check your hostname in /etc/hostname
tkl

and  check your /etc/hosts, if in your configuration sam with this :
127.0.0.1        localhost.localdomain localhost

you can change with example :
127.0.0.1        localhost    tkl

now, edit  your SELINUX in /etc/selinux/config, SELINUX=disable
# This file controls the state of SELinux on the system.
# SELINUX= can take one of these three values:
#     enforcing - SELinux security policy is enforced.
#     permissive - SELinux prints warnings instead of enforcing.
#     disabled - No SELinux policy is loaded.
SELINUX=disable
# SELINUXTYPE= can take one of these two values:
#     targeted - Targeted processes are protected,
#     minimum - Modification of targeted policy. Only selected processes are protected.
#     mls - Multi Level Security protection.
SELINUXTYPE=targeted  


now, you can try
sudo service httpd start 

and enjoy guys.. :) 


Tuesday, January 1, 2013

Install Sublime Text 2 via Repo (Fedora 17)


hi guys, now I'll try to share a tutorial on how to install Sublime Text via Repo in Fedora 17. Sublime Text is a text editor full power, because the sublime is a lot of support programming languages ​​such as C #, C + +, PHP, CSS, Lua, Python, Ruby, Rails, Java, HTML and many more. Okay, just us to tutoral installation.

going into a super user:
$ su

add repository :
# yum-config-manager --add-repo http://repo.cloudhike.com/sublime2/fedora/sublime2.repo

enable the repo :
# yum-config-manager --enable

install sublime text :
# yum install sublime-text

i try this tutorial using fedora 17. you can try in another version fedora.
may be useful

Wednesday, December 26, 2012

Download CISCO Packet Tracer 5.3.3 (Mediafire)


Download Packet Trace Windows and Linux Version
on Mediafire

Windows Version

 Linux Version


Download, Install, and Enjoy guys..


Sunday, December 16, 2012

Can't execute script php in httpd


hello, now I will try to give you a tutorial how to cope with the php script is not executed by httpd. how easy to follow this below:

Some linux distros (especially those based on RHEL such as CentOS or Fedora) comes with SELinux enabled by default. This can be checked, and for a change, with the following command:

- Sudo / usr / sbin / getenforce
it will display information
Enforcing

- Sudo / usr / sbin / setenforce Permissive
- / Usr / sbin / getenforce
it will display the Permissive

You can see the current configuration, how
- Sudo / usr / sbin / sestatus

I was in the operating system:
SELinux status: enabled
SELinuxfs mount: / sys / fs / selinux
SELinux root directory: / etc / selinux /
Loaded policy name: targeted
Current mode: permissive
Mode from config file: enforcing
MLS Policy status: enabled
Policy deny_unknown status: allowed
Max kernel policy version: 28

This change can be made ​​permanent by editing the / etc / selinux / config file and set the variable SELinux to permissive or disabled.

But, the correct way to solve this kind of issue, if you are indeed in this situation, is to check the / var / log / audit / audit.log log file. It will Contain all the events related to SELinux rules. You'll then probably your script should give the correct context, ie being authorized to be run by the apache / php user. Checking SELinux security context is done with ls-Z:

- ls- alZ / var / www / cgi-bin /
drwxr-xr-x. root root system_u: object_r: httpd_sys_script_exec_t: s0.
drwxr-xr-x. root root system_u: object_r: httpd_sys_content_t: s0 ..


good luck and hopefully useful.

How to extract file .rar on Fedora 12,13,14


basically archives can be read by the operating system Linux in general is. zipped. tar.gz but when we menumkan file. rar in linux operating system, we will kesulitas to extract the archive. need to install additional applications called unrar. where unrar is a project of the RARLAB. okay, to get the file can be downloaded at the link below:

- Unrar 32 bit, Download
- Unrar 64 bit, Download

or visit the website RARLAB.


the first to be done, we have to extract unrar files that we download.

- Go to the terminal, and go to the location where the file is located.
- Extract the contents of the file by typing the tra -xvf namafile.tar.gz
- Then go into the extracted files directory named rar or can be adapted to the state of the file name
- After going into a root, type ./unrar
- After that, we copy beberpa file by cp rar unrar / bin
- Once copied now you can do extract archives.rar

how to extract:
- unrar e namafile.rar

Thus this tutorial, may be useful.

sorry, if my english not so good. 

Thursday, December 13, 2012

Change Root Directory of httpd on Fedora


in here, i using fedora 17.

The default root directory is at /var/www/html. In my case, I want to change it to /home/user/web.

1.  edit file apache configuration you mus as root access

sudo gedit /etc/httpd/conf/httpd.conf

Find these two lines


DocumentRoot "/var/www/html"


<Directory "/var/www/html">

then, change to

DocumentRoot "/home/user/www"

<Directory "/home/user/www">

before edit this file you must create folder as name www or other name.

2. Changing permission

chmod 711 /home/user
chmod -R 755 /home/user/www

and then, configuration as bellow

setsebool -P httpd_enable_homedirs 1
chcon -R -t httpd_sys_content_t /home/user/www
apache can access your folder www. you mus configuration access. and now follow this step.
chown root:user /home/user/www

restart your apache:

service restart httpd or systemctl restart httpd.service

create some file on folder www and open in your browser.


good luck and hopefully useful.
sorry, if my english not so good. 


Installing Apache2, PHP5, MySQL and phpMyAdmin on Fedora 17


Hi, there... now we will try Install and configuration Web Server on Fedora 17. Now, let's try :

Open your terminal and using access root user

1. Install MySQL and MySQL Server

yum install mysql mysql-server

after install you must create system startup link for MySQL (so that MySQL starts automatically whenever the system boots):

systemctl enable mysqld.service
systemctl start mysqld.service


and then run

mysql_secure_installation

to set password for user root :

mysql_secure_installation


NOTE: RUNNING ALL PARTS OF THIS SCRIPT IS RECOMMENDED FOR ALL MySQL
      SERVERS IN PRODUCTION USE!  PLEASE READ EACH STEP CAREFULLY!


In order to log into MySQL to secure it, we'll need the current
password for the root user.  If you've just installed MySQL, and
you haven't set the root password yet, the password will be blank,
so you should just press enter here.

Enter current password for root (enter for none):
 <-- ENTER
OK, successfully used password, moving on...

Setting the root password ensures that nobody can log into the MySQL
root user without the proper authorisation.

Set root password? [Y/n]
 <-- ENTER Y or n
New password: <-- yourrootsqlpassword
Re-enter new password: <-- yourrootsqlpassword
Password updated successfully!
Reloading privilege tables..
 ... Success!


By default, a MySQL installation has an anonymous user, allowing anyone
to log into MySQL without having to have a user account created for
them.  This is intended only for testing, and to make the installation
go a bit smoother.  You should remove them before moving into a
production environment.

Remove anonymous users? [Y/n]
 <-- ENTER Y
 ... Success!

Normally, root should only be allowed to connect from 'localhost'.  This
ensures that someone cannot guess at the root password from the network.

Disallow root login remotely? [Y/n]
 <-- ENTER Y
 ... Success!

By default, MySQL comes with a database named 'test' that anyone can
access.  This is also intended only for testing, and should be removed
before moving into a production environment.

Remove test database and access to it? [Y/n]
 <-- ENTER Y
 - Dropping test database...
 ... Success!
 - Removing privileges on test database...
 ... Success!

Reloading the privilege tables will ensure that all changes made so far
will take effect immediately.

Reload privilege tables now? [Y/n]
 <-- ENTER Y
 ... Success!

Cleaning up...


All done!  If you've completed all of the above steps, your MySQL
installation should now be secure.

Thanks for using MySQL!


2. Install Httpd from apache

yum install httpd

enable your apache

systemctl enable httpd.service

start service :
you can use, service httpd start
or, systemctl start httpd.service

open your browser and tipe in ulr bar : http://localhost

3. Install PHP5

yum install php

restart apache after install php

service restart httpd or systemctl restart http.service

try php function

run nautilus on your terminal, change directory /var/www/html and create file info.php and then insert this script
<?php
  phpinfo();
?>

save, and open in your browser http://localhost/info.php

4. Getting MySQL support PHP5

yum search php

you will find many packet for install, but i recommended for you. For install this packet

yum install php-mysql php-gd php-imap php-ldap php-odbc php-pear php-xml php-xmlrpc php-magickwand php-mbstring php-mcrypt php-mssql php-shout php-snmp php-soap php-tidy

APC is a free and open PHP opcode cacher for caching and optimizing PHP intermediate code and you can be install as follows :

yum install php-pecl-apc

and now, restart apache

service httpd restart or systemctl restart httpd.service

and then cek your packet on http://localhost/info.php

5. Install phpMyAdmin

yum install phpMyAdmin

and config file same with this :

sudo gedit /etc/httpd/conf.d/phpMyAdmin.conf 

# phpMyAdmin - Web based MySQL browser written in php
#
# Allows only localhost by default
#
# But allowing phpMyAdmin to anyone other than localhost should be considered
# dangerous unless properly secured by SSL

Alias /phpMyAdmin /usr/share/phpMyAdmin
Alias /phpmyadmin /usr/share/phpMyAdmin

#<Directory /usr/share/phpMyAdmin/>
#   <IfModule mod_authz_core.c>
#     # Apache 2.4
#     <RequireAny>
#       Require ip 127.0.0.1
#       Require ip ::1
#     </RequireAny>
#   </IfModule>
#   <IfModule !mod_authz_core.c>
#     # Apache 2.2
#     Order Deny,Allow
#     Deny from All
#     Allow from 127.0.0.1
#     Allow from ::1
#   </IfModule>
#</Directory>

<Directory /usr/share/phpMyAdmin/setup/>
   <IfModule mod_authz_core.c>
     # Apache 2.4
     <RequireAny>
       Require ip 127.0.0.1
       Require ip ::1
     </RequireAny>
   </IfModule>
   <IfModule !mod_authz_core.c>
     # Apache 2.2
     Order Deny,Allow
     Deny from All
     Allow from 127.0.0.1
     Allow from ::1
   </IfModule>
</Directory>

# These directories do not require access over HTTP - taken from the original
# phpMyAdmin upstream tarball
#
<Directory /usr/share/phpMyAdmin/libraries/>
    Order Deny,Allow
    Deny from All
    Allow from None
</Directory>

<Directory /usr/share/phpMyAdmin/setup/lib/>
    Order Deny,Allow
    Deny from All
    Allow from None
</Directory>

<Directory /usr/share/phpMyAdmin/setup/frames/>
    Order Deny,Allow
    Deny from All
    Allow from None
</Directory>

# This configuration prevents mod_security at phpMyAdmin directories from
# filtering SQL etc.  This may break your mod_security implementation.
#
#<IfModule mod_security.c>
#    <Directory /usr/share/phpMyAdmin/>
#        SecRuleInheritance Off
#    </Directory>
#</IfModule>
 
save and close.
 
restart apache, systemctl restart httpd.service and open in your browser http://localhost/phpmyadmin
 
 
good luck and hopefully useful.
sorry, if my english not so good.  


Wednesday, December 12, 2012

Install Skype 4.0 on Fedora 64bit


- Download the latest beta from the Skype Website from here

run on root access :

-- Install dependencies by running:
yum install-y qt-x11.i686 libXScrnSaver.i686 alsa-plugins-pulseaudio.i686 libXv.i686

-- Install Skype by running:
yum install --nogpgcheck -y skype-2.2.0.25-fedora.i586.rpm
good luck and hopefully useful. 

Install Ruby on Rails on Fedora 17


Ruby on Rails is a framework built on a programming language with object-oriented programming paradigm. Author Ruby programming language from Japan that Yukihiro Matsumoto, et al. Ruby was born in 1995.

Ruby on Rails merupakang development of the Ruby language support in the form of a framework for the application that is server side webiste. Developer Ruby on Rails is David Heinemeier Hansson.

Ok, now we go into the process of installing Ruby on Rails.
1. Open a terminal in Ubuntu (ctrl + alt + t)
2. Update using the commands in the terminal
sudo yum update

3. Install git using the command
sudo yum install git

4. Install curl using the command
sudo yum install curl

after the installation is complete curl do command as below
\ curl-kL https://get.rvm.io | bash-s stable
wait for it to finish.

5. Still in the terminal. Typing the command line like this:
source / etc / profile

if it did the next command as below:
rvm user gemsets

further typing the command like this:
rvm user all

in this stage, we adjust to the conditions that exist on your operating system:
- Source ~ / .rvm / scripts / RVM or
- Source ~ /. rvm /
if your operating system is no such directory scripts / rvm then use the command source ~ / .rvm / scripts /rvm check by pressing the tab on your computer keyboard. If no, you can use the command source ~ /. rvm /


then we checked the RVM package. Is RVM package is working or not. You do this by typing the following command in the terminal:
type rvm | head -n 1
press enter, a meal will issue a statement RVM is a function

after that, do check use in the RVM by typing the command:
rvm requirements


after checking. it will come out the list of packages that you must install. by the time I checked, the package should I install as below:
sudo apt-get install build-essential openssl libreadline6
libreadline6-dev curl git-core zlib1g zlib1g-dev libssl-dev libyaml-dev
libsqlite3-dev sqlite3 libxml2-dev libxslt-dev autoconf libc6-dev ncurses-dev automake libtool bison subversion pkg-config


you can customize the package as it is.


after all that is done, now install Ruby.
6. check the package ruby available apda RVM repository
rvm list known

7. select according to need. and do the installation by typing a command like this:
rvm install 1.9.3

then use the existing ruby package by typing the command:
rvm use 1.9.3 - default

check for updates:
ruby-v


8. select according to need. and do the installation by typing a command like this:
RVM install 1.9.3

then use the existing ruby package by typing the command:
RVM use 1.9.3 - default

check for updates:
ruby -v

9. Ruby on Rails is basically using SQLite database. Well if you want to use the MySQL database you can install MySQL with commands like the following:
sudo yum install mysql-server mysql-libs mysql-devel
gem install mysql2


[root@fc11 ~]# cd /usr/lib
[root@fc11 lib]# ln -s mysql/libmysqlclient.so
[root@fc11 lib]# ln -s mysql/libmysqlclient.so.16
[root@fc11 lib]# ln -s mysql/libmysqlclient_r.so
[root@fc11 lib]# ln -s mysql/libmysqlclient_r.so.16


9. now kta install rails use by:
gem install rails
gem install libv8
gem install therubyracer

the installation process is complete ..
to start the project please follow the command as follows:
into your project directory and typing a command like the following in the terminal:
rails new testapp (if it will use SQLite database)
rails new testapp -d mysql (if you want to use a MySQL database)

open file name Gemfile
add this script below #Bundle edge Rails instead:
gem 'therubyracer '

cd dir/
and run script in terminal


kedala entry project directory that you created above.
and typing
rails s

Open a browser and typing the address
http://localhost:3000

good luck and hopefully useful.

Friday, December 7, 2012

Install Linux Ubuntu 12.04 and 12.10 using Live USB


1. Creating Boot in Linux Live USB using USB
2. Set boot priority in the bios as USB or Boot with USB
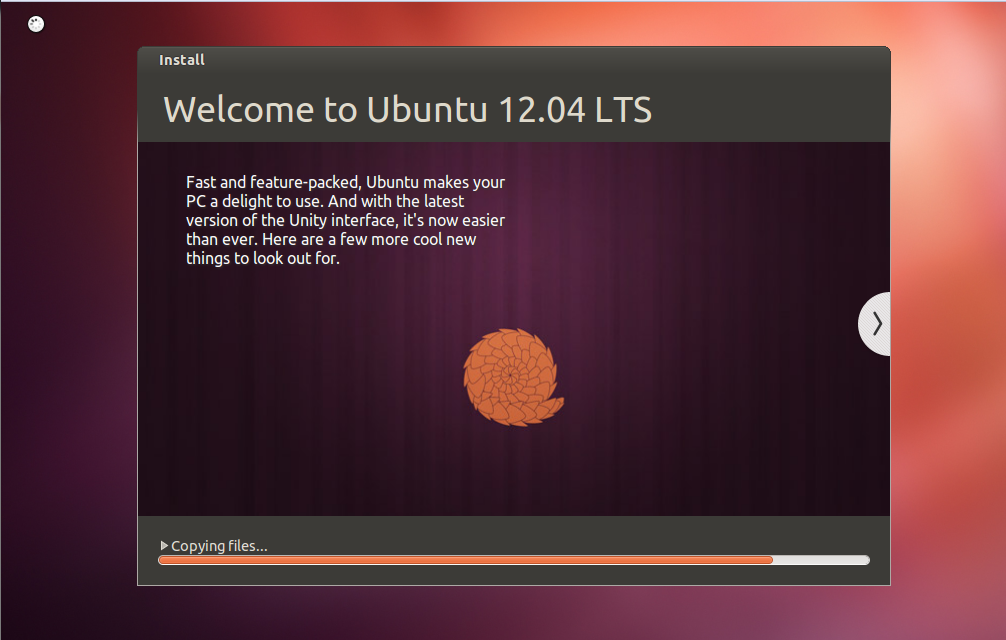
3. After that, exit the Bios it will appear like this


4. Wait a few seconds or minutes until the display appears as below

- Try Ubuntu: to try a standard feature in Ubuntu using live USB
- Install Ubuntu: for permanent installation in a computer system

5. Select Install Ubuntu and will appear as below

6. Select Continue, then the display appears as below

  • Erase disk and install Ubuntu, then you will give full access to Porses instalalis Ubuntu to manage HDD you have
  • Something else, this is an option to manage the HDD as where the user needs.
7. Choose Something Else eat will appear below

8. Select the free space and select add. Then the display will appear below

At this stage we will create a swap partition, swap partition which is as pembatu memory (RAM) you have. The state of memory in this tutorial is 512 MB ​​and the memory swap is 2x of which is owned. If we have a number of 2GB of memory or more, we do not need to make this swap partition. click Ok

9. Having made ​​the step number 8 is complete, we continued to make the system partition for Ubuntu. Select Add again, and will appear as below tampilah

Format HDD using Ext4 or Ext3 because it's a format specifically designed for the Linux Operating System. Type for the new partition, Location for the new partition, Use as, Mount Point equate it with the picture above. click Ok

10. After that, it is the result of the configuration process number 8 and 9

Click the Install Now

11. After clicking Install Now we will be faced with the configuration as below
- Configure time zone, can be sesuiakan with our location. Continue

- This is the configuration that we use Keyboard Layout. Continue


- This is the user configuration, you can set Owner's Name, Computer Name, Username and password for a Super User. Continue

12. Once the configuration is complete the display will appear below

Just waiting for the installation process is complete.

13. Installation is complete, click Restart Now


Installing Ubuntu Linux Tutorial 12.04 finish, may be useful


Install and configuration phpmyadmin on Ubuntu 12.04 and 12.10


Install Web Server on Ubuntu 12.04 and 12.10


LAMP stands for Linux Apache MySQL PHP. Here we will try to install Web Server in the Linux operating system Ubuntu 12.04 and 12.10
okay, we just go into it. First we get into that super-user to facilitate the installation process.

1. Open your terminal and into the super user by typing
sudo su

2. Once inside now we install MySQL 5. How typing the command like this:

apt-get install mysql-server mysql-client

during the installation process will be completed you will be faced with the interface to enter the password:
- New password for the MySQL "root" user: (enter the password or be left blank)
- Repeat password for the MySQL "root" user: (ulangin password before)

3. MySQL after installation is complete, now we get into the process intalasi apache2. way as follows:

apt-get install apache2

after installation, to check his apache2 running or not, please open your browser http://localhost/ typing experience
if the installation process is complete it will display the page that reads:

"It Works!"

4. Next, we will install PHP5. way as follows:

apt-get install php5 libapache2-mod-php5

after PHP5 installation is complete, restart the apache2 it by typing the command

service apache2 restart

5. and reopen your bowser. by typing the address http://localhost/ in your browser. to try PHP5 is installed or not, you can create a php file with the www folder. how to type a command like this:

vi / var / www / info.php

then panggila in your browser: http://localhost/info.php

6. php library to complement you can do a command like this:

apt-cache search php5

or you can perform a direct installation commands are like below:
apt-get install php5-mysql php5-curl php5-gd php5-idn php-pear php5-imap php5-Imagick php5-mcrypt php5-memcache php5-ming php5-ps php5-pspell php5-recode php5-snmp php5-sqlite php5 php5-tidy php5-xsl-XMLRPC

7. after the installation is complete, open your browser. by typing the address http://localhost/info.php


LAMP installation process is complete, may be useful.

How to Install Ruby on Rails (ROR) on Ubuntu 12.4 and 12.10


Ruby on Rails is a framework built on a programming language with object-oriented programming paradigm. Author Ruby programming language from Japan that Yukihiro Matsumoto, et al. Ruby was born in 1995.

Ruby on Rails merupakang development of the Ruby language support in the form of a framework for the application that is server side webiste. Developer Ruby on Rails is David Heinemeier Hansson.

Ok, now we go into the process of installing Ruby on Rails.
1. Open a terminal in Ubuntu (ctrl + alt + t)
2. Update using the commands in the terminal
sudo apt-get update

3. Install git using the command
sudo apt-get install git

4. Install curl using the command
sudo apt-get install curl

after the installation is complete curl do command as below
\ curl-kL https://get.rvm.io | bash-s stable
wait for it to finish.

5. Still in the terminal. Typing the command line like this:
source / etc / profile

if it did the next command as below:
rvm user gemsets

further typing the command like this:
rvm user all

in this stage, we adjust to the conditions that exist on your operating system:
- Source ~ / .rvm / scripts / RVM or
- Source ~ /. rvm /
if your operating system is no such directory scripts / rvm then use the command source ~ / .rvm / scripts /rvm check by pressing the tab on your computer keyboard. If no, you can use the command source ~ /. rvm /


then we checked the RVM package. Is RVM package is working or not. You do this by typing the following command in the terminal:
type rvm | head-n 1
press enter, a meal will issue a statement RVM is a function

after that, do check use in the RVM by typing the command:
rvm requirements


after checking. it will come out the list of packages that you must install. by the time I checked, the package should I install as below:
sudo apt-get install build-essential openssl libreadline6
libreadline6-dev curl git-core zlib1g zlib1g-dev libssl-dev libyaml-dev
libsqlite3-dev sqlite3 libxml2-dev libxslt-dev autoconf libc6-dev ncurses-dev automake libtool bison subversion pkg-config


you can customize the package as it is.

6. his next install node.js (this is optional)
sudo apt-add-repository ppa: chris-lea/node.js
sudo apt-get update
sudo apt-get install nodejs


after all that is done, now install Ruby.
7. check the package ruby available apda RVM repository
rvm list known

8. select according to need. and do the installation by typing a command like this:
rvm install 1.9.3

then use the existing ruby package by typing the command:
rvm use 1.9.3 - default

check for updates:
ruby -v

9. Ruby on Rails is basically using SQLite database. Well if you want to use the MySQL database you can install MySQL with commands like the following:
sudo apt-get install libmysql-ruby libmysqlclient-dev
gem install mysql2

10. now kta install rails use by:
gem install rails

the installation process is complete ..
to start the project please follow the command as follows:
into your project directory and typing a command like the following in the terminal:
rails new testapp (if it will use SQLite database)
rails new testapp-d mysql (if you want to use a MySQL database)

kedala entry project directory that you created above.
and typing
rails s

Open a browser and typing the address
http://localhost:3000

good luck and hopefully useful.